A bunch of today’s web apps is relying upon a massive amount of content generated by their users, to the point that we can say they’re actually made-up of User-Generated Content (UGC). One challenge is when such content has notable file size. In this tutorial you’ll learn how to leverage Amazon Cloudfront as a Content Delivery Network (CDN) to serve users-uploaded files, as well as static assets of your Rails app.
A common scenario: Carrierwave + Fog + S3
Carrierwave is a very powerful and popular gem to manage file uploads; combining it with the fog gem is a common practice to get your files stored on Amazon S3:
CarrierWave.configure do |config|
  config.fog_provider = 'fog/aws'
  config.fog_credentials = {
    provider:              'AWS',
    aws_access_key_id:     ENV['S3_KEY'],
    aws_secret_access_key: ENV['S3_SECRET'],
    region:                ENV['S3_REGION']
  }
  config.fog_directory  = ENV['S3_BUCKET_NAME']
  config.fog_public     = true
end
Creating your CloudFront CDN
Amazon calls your app’s CDN a Distribution: it’s made up of 2 main components:
-
Origins: your own server(s) or S3 buckets where your original files are stored;
-
Behaviors: URL-pattern -based rules that instruct CloudFront where to go and fetch files when they’re not in cache yet.
We’ll now create our CloudFront distribution with 2 origins: the Amazon S3 bucket where our users are uploading files, and the host where our app is alive and kicking. Login to your AWS console, navigate to the CloudFront dashboard and create a Web Distribution. As a Distribution needs at least one Origin, the first fields group is, indeed, Origin Settings:
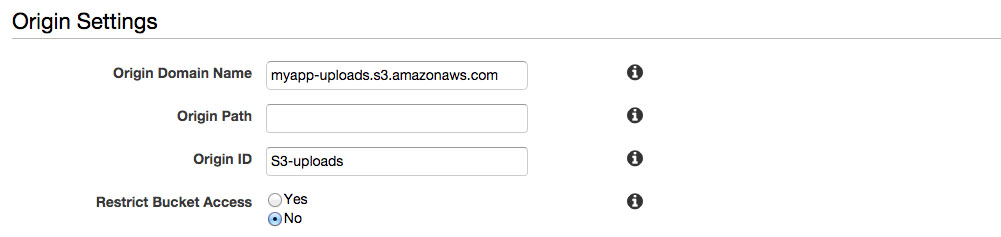
Like in the above screen, let’s set our apps’ uploads S3 bucket as the first origin; you’ll be able to select Origin Domain Name from a dropdown, whereas for Origin ID you just need to make sure it’s unique (and self-explanatory) for your distribution.
Each distribution needs a Default Behavior: it’s the one that captures all requests who don’t match any other Behavior’s URL pattern. Then next fields group is for this purpose, and you can just leave the default values as they are.
The third fields group is Distribution Settings; to the purpose of our tutorial, you can keep default values here too. So now just press the Create Distribution button!
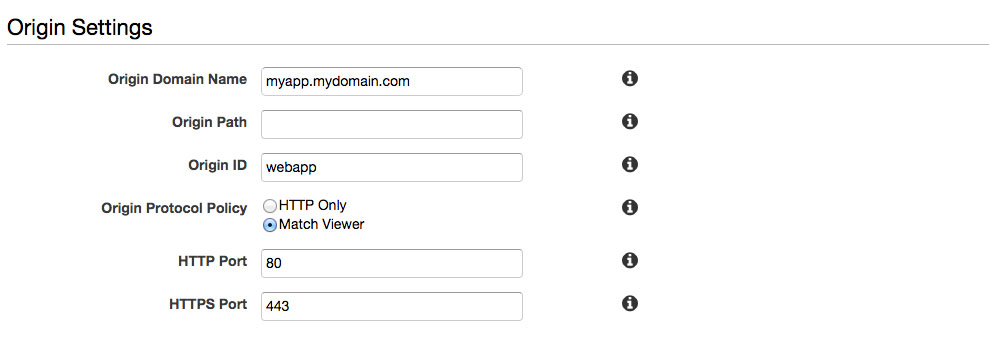
Now go and edit the distribuition you just created, move to the Origin tab and press Create Origin. Remember? We need to add your app’s host as our second origin:
Now it’s time to make your web app aware of your CDN! Just copy to clipboard your distribution’s Domain Name and save it into an environment variable, for example in case you’re using the dotenv-rails gem just add the following line to your .env file:
CDN_URL=<random-subdomain>.cloudfront.net
Caching User-Generated Content on your CDN
First, you want Carrierwave to be aware of your CDN, so that it can prepend CDN Domain Name to generated URLs for your attachments, on production environment. To do so, just add one line to your Carrierwave configuration:
CarrierWave.configure do |config|
  # Other configs here
  config.asset_host = ENV['CDN_URL'] if Rails.env.production?
end
In order to capture all user-uploaded files requests with a single Behavior rule in CloudFront, one solution is to have all files stored under a common root folder on your S3 bucket. Let’s call such folder media; after creating it on the S3 bucket, you’ll need to prepend it in your uploader’s store_dir method, like this:
def store_dir
  "media/your/previous/store/dir"
end
If your app is already live and the S3 bucket contains content that matters to your users, you’ll need to move all of that to the media folder; to accomplish that, you can either use S3 web console or create a script using S3 APIs.
Now let’s create the Behavior rule on CloudFront like this:

You might later want to fine-tune Object Caching, but for now let’s use Origin Cache Headers.
Caching static assets on your CDN
We’ve covered the most interesting part so far, but the plain-old usage of a CDN is to cache a web app’s static assets. To do so, let’s first add the following line to config/environments/production.rb:
config.action_controller.asset_host = ENV['CDN_URL']
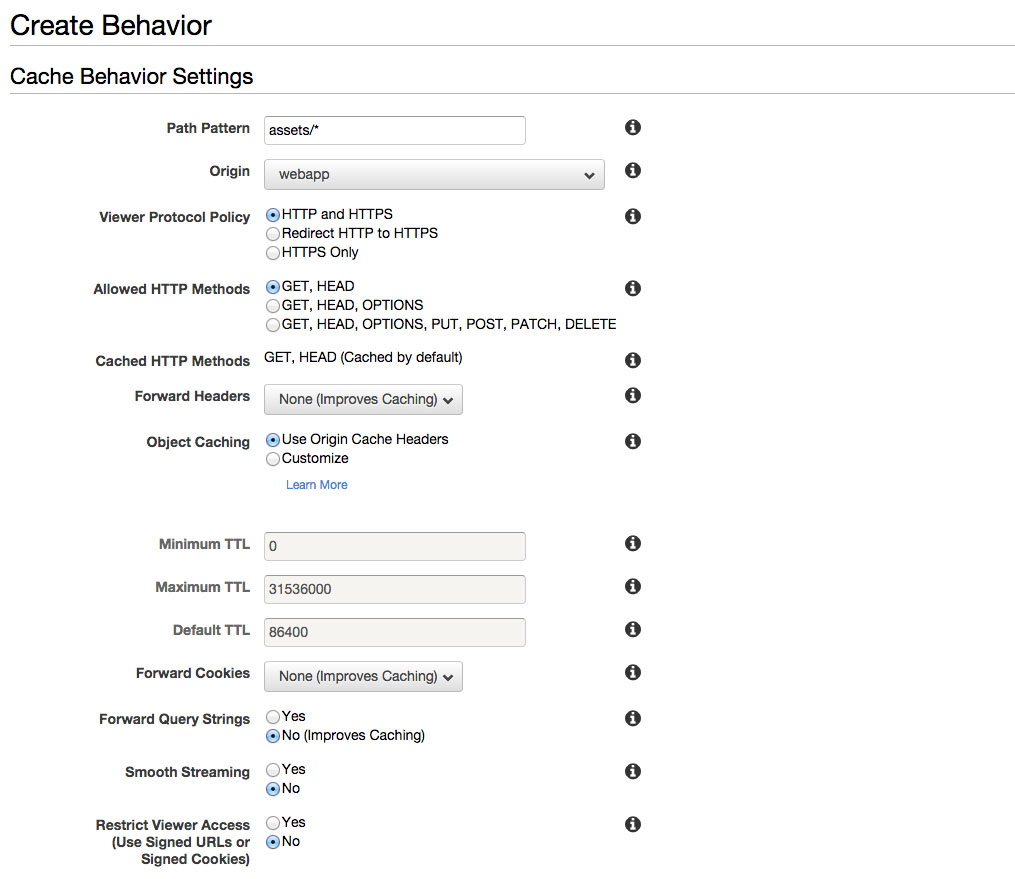
Then, let’s tell CloudFront to fetch all requests matching the assets/* pattern from the webapp origin, by creating a Behavior like this:
Complying with CORS on Fonts
You might have Fonts among your assets, and now they’re going to be served by your CDN to your users’ web browsers. To comply with CSS3 Fonts W3C’s specs, fonts are subject to Same-Origin Policy (SOP) restrictions - if you’re curious as to why the hell is that, just read here.
Now we want to implement CORS to relax SOP for our fonts. First step is to properly configure your web server to add Access-Control-Allow-Origin header; if you’re using nginx you might have something like:
  location ~* \.(eot|oft|svg|ttf|woff|woff2)$ {
    add_header Access-Control-Allow-Origin *;
    expires max;
    log_not_found off;
    access_log off;
    add_header Cache-Control public;
    fastcgi_hide_header Set-Cookie;
  }
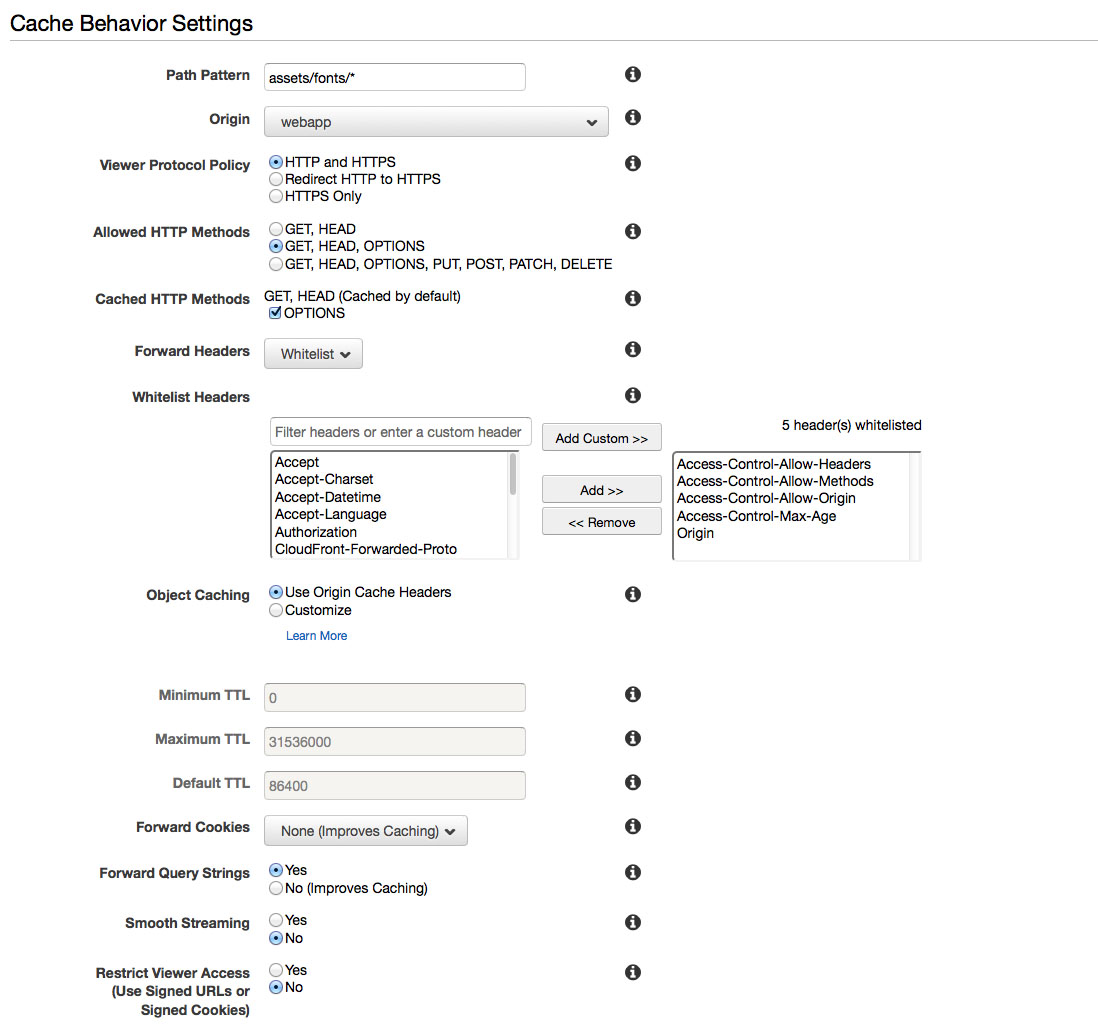
Now you need to tell CloudFront to behave differently when the request URL matches assets/fonts/*, so you’ll create a new Behavior and set it to:
-
support HTTP
OPTIONSmethod - needed for the preflight-request; -
forward all headers needed by CORS;
-
forward query strings.
Beware: you’ll need to assign this behavior higher priority than the one matching the assets/* pattern. You can achieve that in the Behaviors page by selecting the behavior and pressing Move Up and Move Down buttons, and then Save.
Conclusion
After your CDN has been fully deployed (it usually takes 15 minutes after the last config change), just access your web app and have a look at network stats in your brower’s developer tools, and… enjoy the thrill of speed!
Thanks for reading so far! Looking forward to hear your comments, questions, improvements!
Speed-up User-Generated Content with CloudFront via @algodave
Click to tweet